If you’ve ever cracked or damaged your phone’s screen, you know the feeling of panic and frustration that follows. Fortunately, screen replacements are possible, and they don’t have to be expensive if you’re willing to take on the job yourself. This blog will guide you through the process of replacing the LCD screen on several popular smartphone models: ITEL A80 (A671L), Tecno KL4, and Tecno KL5. Additionally, we’ll cover the tools required for the job and provide tips to make the process as smooth as possible.
Why Should You Replace Your LCD Screen?
The LCD (Liquid Crystal Display) screen is one of the most vital components of your smartphone. If it breaks or becomes unresponsive, it can render the device almost useless. Whether it’s due to accidental drops, pressure damage, or prolonged wear and tear, a damaged LCD can cause issues such as:
- Dead pixels
- Cracked or shattered screen
- Unresponsive touch functionality
- Distorted color or black spots
Replacing your LCD screen not only restores the look and functionality of your device but can also save you money compared to seeking professional repair services.
Models We’re Focusing On:
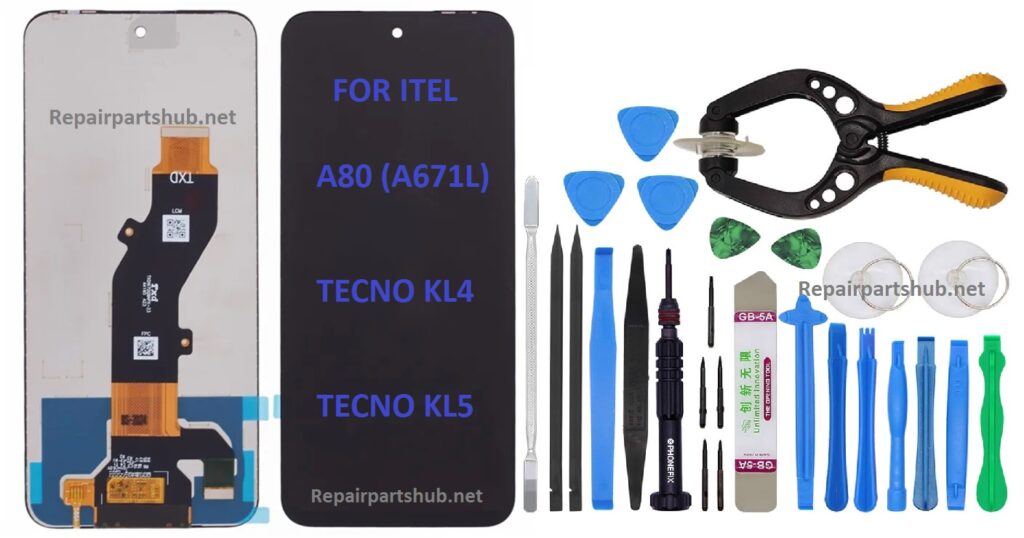
- ITEL A80 (A671L)
- Tecno KL4
- Tecno KL5
These models share some similarities in their design and structure, but there are specific differences to note when replacing the LCD screen. Let’s go step-by-step on the process.
Tools Required for Screen Replacement
Before diving into the replacement process, it’s essential to have the right tools to ensure a smooth repair. Here’s a list of the tools you’ll need:
- Small Philips Screwdriver – Most phones use small screws that require a precision screwdriver.
- Plastic Pry Tools – These are used to gently open the phone without damaging its components.
- Suction Cup Tool – Ideal for lifting the screen away from the phone’s body without applying excess force.
- Tweezers – For handling small components.
- SIM Card Ejector Tool – To remove the SIM tray.
- Heat Gun or Hair Dryer – Helps soften adhesive for easier separation of the screen.
- Anti-Static Wrist Strap – To prevent damage to internal components from static electricity.
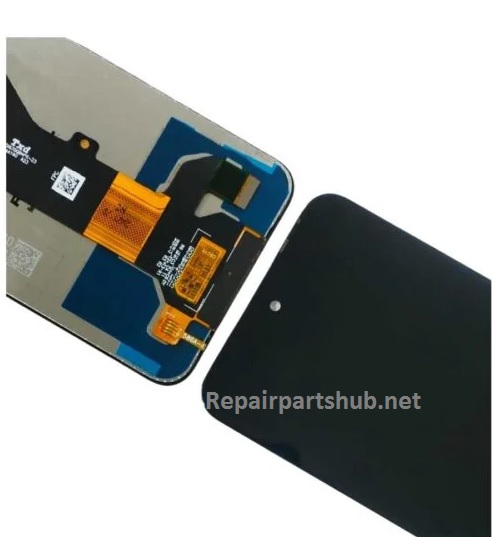
- Replacement LCD Screen – Be sure to get the correct part number for your specific phone model.
- Plastic Spudger – A tool for detaching cables and connectors safely.
- Tweezers – For handling delicate components.
These tools will make the repair process easier and safer, reducing the chances of damaging the phone’s internal parts.
Step-by-Step Process for LCD Replacement
Here’s a detailed guide for replacing the LCD screen for ITEL A80 (A671L), Tecno KL4, and Tecno KL5.
1. Power Off the Device
Before starting any repair, ensure your phone is completely powered off. Removing the battery is a good idea if your device allows this, but in many modern smartphones, the battery is non-removable.
2. Remove the SIM Tray
Use a SIM card ejector tool to remove the SIM tray from the phone. This ensures that no parts are in the way when separating the back cover.
3. Heat the Phone
Using a heat gun or hairdryer, gently heat the edges of the phone’s screen. This softens the adhesive used to bond the LCD to the phone’s frame, making the process easier and reducing the risk of cracking the screen further.
4. Pry Open the Phone
Use a suction cup tool to lift the screen from the body. If your phone doesn’t have a clear gap, use a plastic pry tool to gently insert between the frame and screen. Be careful not to apply too much force, as this can damage the device.
5. Unscrew the Phone (if necessary)
In some cases, you may need to remove screws holding the screen assembly in place. Use a small Phillips screwdriver to remove the screws. Keep them in a safe place for reassembly.
6. Disconnect the Cables
Once you’ve freed the screen, you will see cables connecting the LCD to the motherboard. Use a plastic spudger or tweezers to gently disconnect these cables.
7. Remove the Broken LCD
After disconnecting the necessary components, carefully remove the broken LCD screen from the phone’s frame.
8. Install the New LCD Screen
Take the replacement LCD screen and connect it to the phone’s motherboard. Ensure the cables are properly connected and the screen is aligned with the frame.
9. Reassemble the Phone
Once the new LCD is in place, carefully screw everything back into position. If your model has screws around the edges, tighten them securely, but don’t overtighten, as this can cause further damage.
10. Test the New LCD
Before sealing up the phone, power it on to test the new screen. Ensure the touch functionality works correctly, and check for any screen defects, such as dead pixels or backlight issues.
11. Final Assembly
Once you’re satisfied that the new screen works perfectly, snap the back cover back into place. Insert the SIM tray, power the phone on, and you’re good to go!
Tips for a Successful LCD Replacement
- Take Your Time – Rushing through the repair can cause mistakes. Take it slow, and be patient with each step.
- Document the Process – If you’re not experienced with phone repairs, take photos or notes during disassembly so you can refer back to them when reassembling.
- Check Compatibility – Make sure the replacement LCD is compatible with your phone model. Using an incorrect part can lead to functional issues or a poor fit.
- Stay Organized – Keep all screws and components in separate containers to avoid losing them during the repair process.
- Test After Replacing – Always power the phone on before final assembly to make sure everything works.
Common Issues to Watch Out For
- Touch Sensitivity Issues: If the new screen isn’t responding to touch, check that the flex cable connectors are fully attached.
- Display Problems: Sometimes, even new LCDs can have faulty pixels or color issues. If you encounter this, return the part for a replacement.
- Static Damage: Be cautious of static electricity, which can damage the phone’s internals. Always use an anti-static wrist strap.
Conclusion
Replacing the LCD screen on your ITEL A80 (A671L), Tecno KL4, or Tecno KL5 can be a rewarding DIY project if done carefully and with the right tools. While it may seem intimidating at first, the process becomes much easier with the right preparation and patience. Following the steps outlined above and using the correct tools will help ensure a successful screen replacement and a fully functional device. If you’re not confident in your abilities, it’s always worth considering professional help, but for those up for the challenge, this guide should provide all the information you need to complete the repair.
Happy repairing!