Introduction
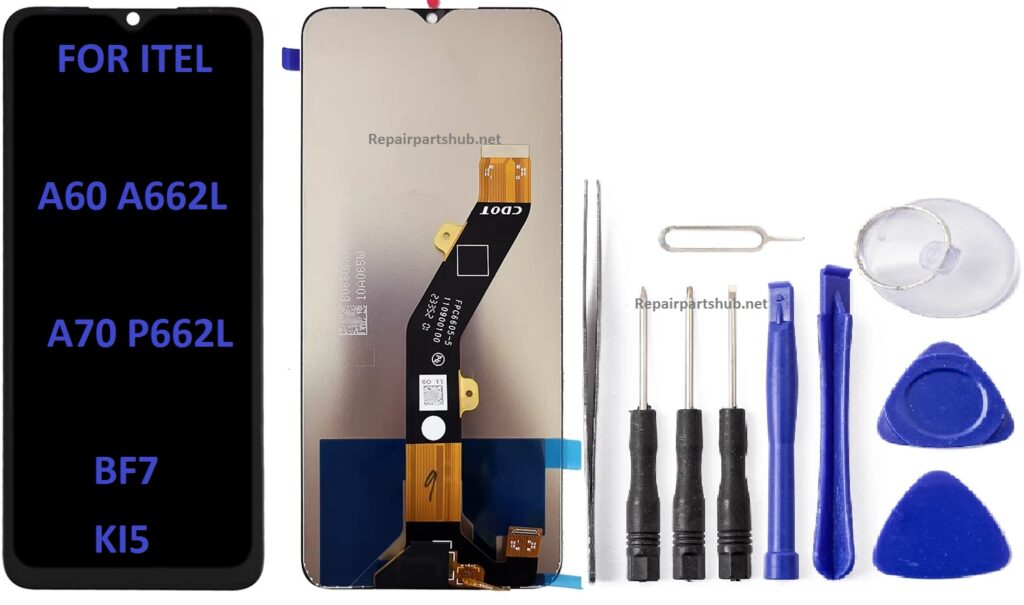
Accidents happen, and your Itel phone’s screen might be the unfortunate victim of a drop or a sudden crack. If you own an Itel A60, A662L, A70, P662L, BF7, or KI5, you might find yourself needing to replace the screen at some point. Whether it’s a shattered display, unresponsive touch screen, or pixel damage, replacing the screen can breathe new life into your device.
This guide will walk you through the process of replacing the screen on these specific Itel models and explain the necessary tools to carry out the replacement smoothly.
Why Replace the Screen?
There are several reasons why you may need to replace the screen on your Itel phone:
- Cracked or shattered display: A common issue after a drop, the display can crack and make the phone unusable.
- Unresponsive touch screen: Sometimes, the screen may still display content, but it may not register touch inputs correctly.
- Flickering or distorted images: If the screen is showing lines, spots, or flickering images, it could indicate an internal issue with the screen.
- Dead pixels: Dead pixels on the screen can be distracting and diminish the quality of your user experience.
Tools Needed for Screen Replacement
To successfully replace the screen on your Itel phone, you’ll need a few specific tools. Here’s a list of the essential tools required:
- Small Phillips Head Screwdriver: To remove screws securing internal parts and components.
- Plastic Pry Tools: These help separate the screen from the phone’s body without damaging the frame or other parts.
- Suction Cup Tool: To gently lift the screen from the frame of the phone without putting pressure on the glass.
- Tweezers: For handling small screws, connectors, and delicate internal components.
- SIM Card Ejector: To remove the SIM tray before starting the disassembly process.
- Heat Gun or Hair Dryer: Used to soften the adhesive that holds the screen in place, making it easier to remove.
- Replacement Screen (LCD and Digitizer Combo): Ensure you have the correct screen replacement that matches your Itel model (A60, A662L, A70, P662L, BF7, KI5).
- Double-Sided Adhesive Tape or Glue: To secure the new screen once it’s installed.
Step-by-Step Guide for Screen Replacement
Step 1: Power Off Your Device
Ensure that your Itel phone is completely powered off before starting the repair. This prevents any accidental shorts or other electrical issues while working on the phone.
Step 2: Remove the SIM Card Tray
Use the SIM card ejector tool to remove the SIM tray from your phone. This ensures no parts get damaged during disassembly and makes the process easier.
Step 3: Unscrew the Back Cover
Use the small Phillips head screwdriver to remove any screws securing the back cover of your Itel device. Gently use plastic pry tools to lift the back cover off the phone. Be cautious while doing this to avoid damaging any internal components.
Step 4: Disconnect the Battery (If Necessary)
In some models, it may be necessary to remove or disconnect the battery to prevent power from flowing through the phone while you work on it. Use tweezers or your hands to gently disconnect the battery.
Step 5: Apply Heat (Optional)
To soften the adhesive holding the screen in place, use a heat gun or hairdryer. Apply gentle heat to the edges of the phone for about 2-3 minutes. Be cautious not to overheat, as this can damage internal components.
Step 6: Remove the Broken Screen
Attach the suction cup tool to the center of the screen and gently pull upwards. As you pull, use the plastic pry tools to carefully work around the edges to separate the screen from the phone’s frame. This should allow the screen to come off without damaging other parts of the device.
Step 7: Disconnect the LCD from the Internal Components
Once the screen is lifted, disconnect any ribbon cables or internal connectors that are attached to the old screen. These connectors usually hold the screen to the motherboard and may be secured with screws. Use tweezers to handle the connectors gently.
Step 8: Install the New Screen
Place the new replacement screen carefully onto the phone’s frame. Connect the necessary ribbon cables and internal connectors to the motherboard. Ensure everything is aligned properly to avoid any issues with the new screen.
Step 9: Secure the Screen
Once the new screen is in place and all connectors are properly attached, use double-sided adhesive tape or a small amount of glue to secure the screen onto the frame. Press down gently to ensure a firm attachment.
Step 10: Reassemble the Phone
Reinstall the back cover of the phone and screw it back into place. If you had removed the battery earlier, reconnect it. Finally, insert the SIM card tray back into the phone.
Step 11: Power On and Test the Device
Before you finalize the repair, power on your device and test the new screen. Make sure the touch functionality works, the display is clear, and no issues like flickering or dead pixels are present. If everything is working fine, your phone should be good to go!
Common Troubleshooting Tips
- Unresponsive Touch: If the touch screen isn’t working after the replacement, ensure the ribbon cables are securely connected. A loose connection is the most common cause of this issue.
- Flickering or Distorted Display: Check the connectors for any loose pins. Ensure they’re properly connected.
- Screen Isn’t Aligning: If the screen isn’t aligning properly with the phone frame, check for any obstructions or misplaced components within the frame.
Where to Buy Replacement Screens
You can purchase replacement screens for your Itel phone from various online stores such as Amazon, eBay, or specific phone repair shops. It’s essential to verify that the replacement screen you’re purchasing is compatible with your phone model (A60, A662L, A70, P662L, BF7, KI5) to avoid any compatibility issues.
Conclusion
Replacing the screen on your Itel A60, A662L, A70, P662L, BF7, or KI5 may seem daunting, but with the right tools and a little patience, it’s a manageable task. By following the steps in this guide, you can restore your phone’s screen to a like-new condition and save money compared to professional repair services.
Remember, screen replacements require careful attention to detail. Using high-quality replacement parts and taking your time with each step will ensure the best results. Whether you’re a DIY enthusiast or just looking to save on repair costs, this guide should help you with the process and get your phone back to working condition in no time!