The Samsung Galaxy Z Fold 3 5G (SM-F926) is one of the most innovative and exciting devices on the market today. With its folding display and flagship specs, it’s a testament to Samsung’s commitment to pushing the boundaries of smartphone technology. However, as with any cutting-edge gadget, repair and maintenance can become a concern—especially when it comes to replacing delicate parts like the LCD screen. In this blog, we’ll take a deep dive into the original LCD screen for the Galaxy Z Fold 3 and the necessary tools for replacing it. Let’s explore everything you need to know to handle a screen replacement efficiently.
Understanding the Samsung Galaxy Z Fold 3 5G
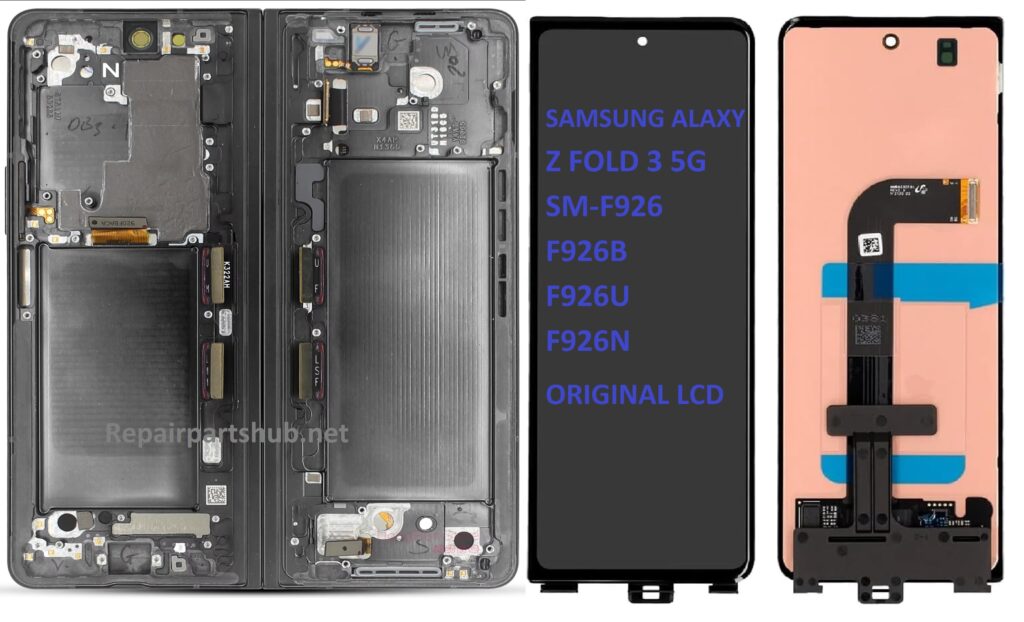
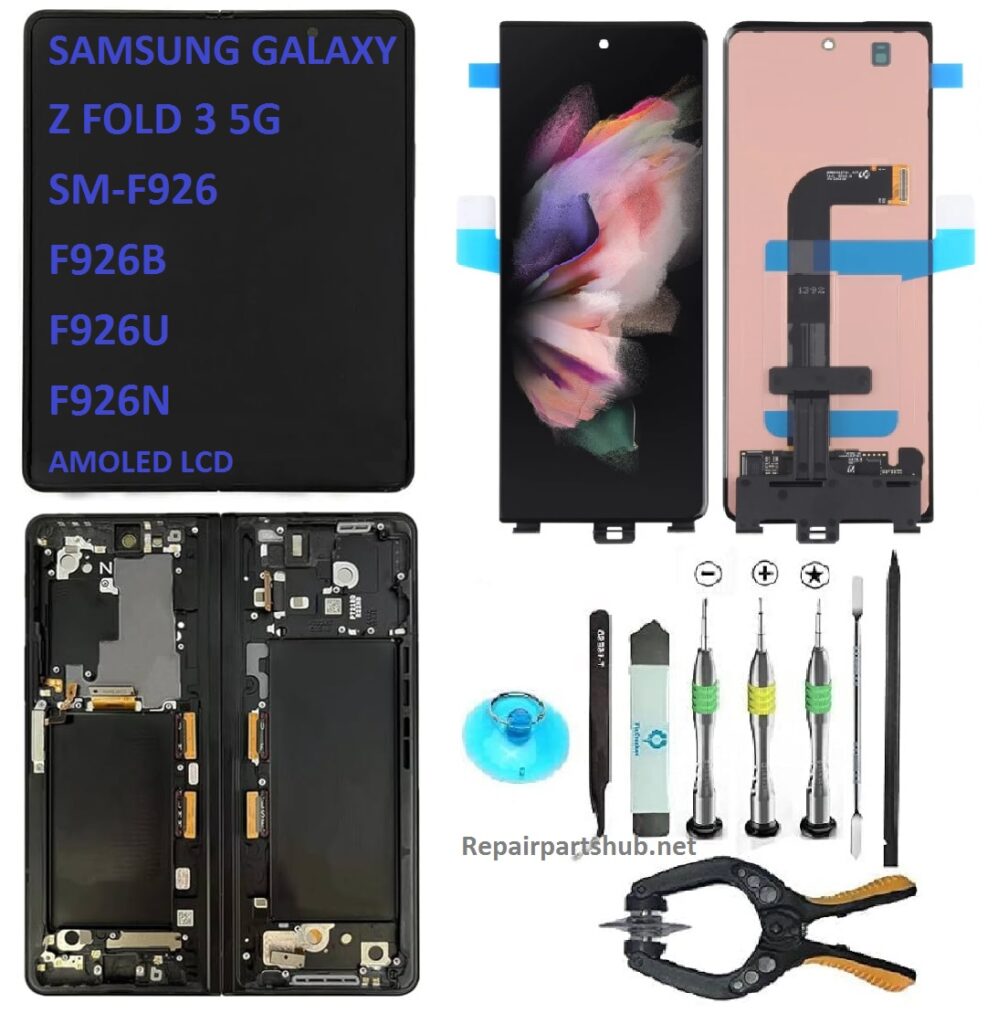
The Samsung Galaxy Z Fold 3 5G, available in various models like the SM-F926B, F926U, and F926N, is a true masterpiece of design. With a 7.6-inch foldable Dynamic AMOLED 2X screen and a 6.2-inch Super AMOLED cover screen, the Z Fold 3 offers an immersive experience, allowing users to switch between a smartphone and a tablet seamlessly. Whether you’re multitasking, watching videos, or playing games, the foldable display makes everything feel larger than life.
However, with such advanced display technology, there’s also the risk of damage, especially to the LCD screen. Since it features a foldable design, extra care is required to handle it, but accidents can happen. If your screen is damaged, cracked, or non-functional, it’s essential to know your options for a replacement.
The Importance of the Original LCD Screen
When it comes to replacing the screen of your Galaxy Z Fold 3, you might wonder whether to go for an original part or a third-party replacement. Here’s why sticking to the original LCD screen is a good idea:
- Quality and Durability: The original LCD screen is built to Samsung’s exacting standards. It offers the same high-quality display you’ve come to expect from the Galaxy Z Fold 3. While third-party screens might seem like an affordable option, they often lack the durability and precise fit of an original part.
- Compatibility: The Samsung Galaxy Z Fold 3’s screen is designed specifically for its foldable form factor. Using an original LCD ensures proper compatibility with the device’s folding mechanism, touchscreen sensitivity, and other features like the 120Hz refresh rate.
- Warranty Protection: If you’re concerned about voiding your warranty, it’s always best to opt for genuine parts when replacing any critical component like the LCD screen. Non-original replacements might interfere with the warranty terms, and you could risk additional issues in the future.
- Perfect Display Quality: The original screen guarantees vibrant colors, sharp contrast, and the high resolution that makes the Z Fold 3’s display one of the best in the industry. Non-original parts often compromise the visual experience.
Replacement LCD Screens: What to Look For
When buying an original LCD screen for the Samsung Galaxy Z Fold 3, you should ensure a few things:
- Model Number Compatibility: Make sure the screen corresponds with your specific variant, whether it’s the SM-F926B, F926U, or F926N. The screen will vary depending on your region or carrier.
- OEM Parts: Ensure you’re purchasing from a reputable source that sells genuine Samsung parts (Original Equipment Manufacturer parts).
- Condition of the Screen: If you’re replacing a damaged LCD, check whether the screen is new or refurbished. Ideally, a brand-new screen is preferable to ensure longevity and performance.
- Price Consideration: Expect to pay a premium for the original LCD screen due to its high quality and craftsmanship. Avoid extremely low-priced screens, as they could be counterfeit or low-quality replicas.
Necessary Tools for Replacing the Galaxy Z Fold 3 LCD Screen
Replacing the LCD screen on your Samsung Galaxy Z Fold 3 is a delicate and challenging process. You’ll need the right tools to ensure you do not damage other parts of the phone. Here’s a list of essential tools to have on hand for a safe and effective screen replacement:
- Screwdrivers (Pentalobe and Torx): These are necessary for removing screws from the device. Be sure to use the correct size to avoid damaging the screws or surrounding parts.
- Heat Gun or Hair Dryer: You will need heat to soften the adhesive holding the screen in place. A heat gun or hair dryer is used to apply gentle heat to the edges of the screen, making it easier to lift off.
- Plastic Pry Tools: Avoid using metal tools, as they can scratch the screen or internal components. Plastic pry tools are safer for separating the screen from the device’s body without damaging any parts.
- Suction Cup Tool: This tool is used to gently lift the screen away from the body after the adhesive has been softened. The suction cup is critical for safely handling the delicate foldable display.
- Tweezers: Tweezers are handy for removing small screws or components inside the phone. Precision is key, especially when dealing with the tiny screws used in the Z Fold 3.
- SIM Card Ejector Tool: In some cases, you may need to eject the SIM card tray to ensure no damage is done to it during the replacement.
- Adhesive Tape or B7000 Adhesive: Once the old LCD is removed, new adhesive will be needed to attach the new screen. Specialized adhesive for phones, such as B7000, ensures the screen is firmly held in place.
- Anti-static Wrist Strap: Static electricity can easily damage sensitive phone components, so it’s always a good idea to wear an anti-static wrist strap to avoid this risk.
- Microfiber Cloths: These are useful for cleaning the screen and removing any smudges or dust that may accumulate during the repair process.
Step-by-Step Guide to Replacing the LCD Screen
- Prepare Your Workspace: Choose a clean, well-lit space to work in. Lay out all your tools and components before you start. If you’re unfamiliar with the procedure, it’s a good idea to watch a tutorial or consult a professional.
- Power Off Your Device: Ensure your Galaxy Z Fold 3 is turned off completely before you begin working on it. You should also remove the SIM card tray to prevent damage.
- Apply Heat to the Edges: Use a heat gun or hair dryer to heat the edges of the screen. Apply heat for around 1-2 minutes to loosen the adhesive.
- Lift the Screen with the Suction Cup: Attach the suction cup tool to the screen, making sure it’s centered. Slowly pull the suction cup to create a gap between the screen and the device body.
- Pry Open the Device: Use a plastic pry tool to gently work your way around the screen, separating it from the body. Be patient and ensure you don’t apply excessive force.
- Remove Screws and Disconnect Components: Once the screen is detached, you’ll need to remove screws securing the internal components. Carefully disconnect any cables and components, including the foldable screen’s connectors.
- Replace the LCD Screen: Place the new LCD screen into the device, ensuring it’s properly aligned. Reconnect the cables and secure the screen with new adhesive.
- Reassemble the Device: Reattach the screws, reinsert the SIM card tray, and gently press the new screen into place. Power on your Galaxy Z Fold 3 to ensure the screen is functioning properly.
- Test the Screen: Check for responsiveness, display quality, and any potential dead pixels or issues. Ensure the fold mechanism works smoothly.
Final Thoughts
Replacing the LCD screen on a Samsung Galaxy Z Fold 3 5G is not a simple task, and it requires patience, skill, and the right tools. While opting for a professional repair is always a safe choice, some users may prefer to tackle the replacement themselves, especially if they’re confident in their technical abilities.
The most important thing is to use the original LCD screen and to handle the repair process with care. With the right tools and careful attention, you can bring your Galaxy Z Fold 3 back to life without compromising on display quality or performance.
If you’re unsure or uncomfortable performing the replacement, don’t hesitate to take your device to a certified repair center. They’ll have the expertise and equipment to get the job done correctly.