The Samsung Galaxy Z Fold 2, a game-changing foldable device, offers a unique blend of smartphone and tablet functionality. With its cutting-edge technology and premium build, it’s no surprise that this phone has become a highly sought-after device. However, with its innovative folding mechanism and delicate display, it’s also prone to damage, especially the internal and external screens.
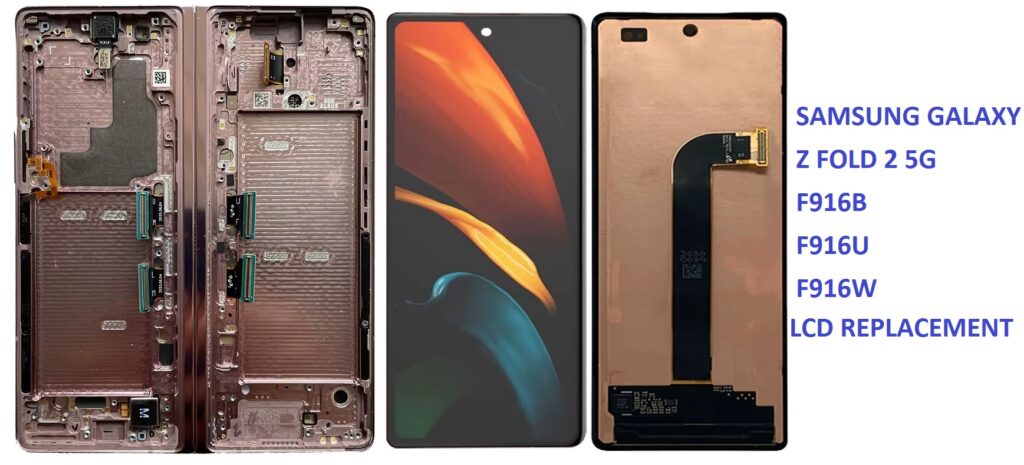
If you’re looking for a comprehensive guide to replacing the internal or external screen of the Samsung Galaxy Z Fold 2 (models F916B, F916U, and F916W), you’ve come to the right place. In this blog, we’ll cover everything you need to know about screen replacement, including the necessary tools, replacement parts, and a detailed, step-by-step guide to help you get the job done.
Why Would You Need a Screen Replacement for the Samsung Galaxy Z Fold 2?
Before diving into the replacement process, it’s important to understand why you might need to replace the screen. The Samsung Galaxy Z Fold 2 is known for its advanced technology, but like all smartphones, it’s vulnerable to damage over time. Common reasons for screen replacement include:
- Cracked or Broken Screen: Whether it’s the external screen or the internal foldable display, a cracked screen is one of the most common reasons for a replacement.
- Display Malfunctions: If the display is flickering, showing dead pixels, or having touch sensitivity issues, screen replacement might be required.
- Cosmetic Damage: Scratches, dents, or wear and tear can affect the aesthetics and functionality of the screen.
- Water or Liquid Damage: Although the Z Fold 2 has some level of water resistance, it’s still not completely waterproof. If you’ve accidentally spilled liquid on the device, a screen replacement may be necessary if water has damaged the display.
Models: Samsung Galaxy Z Fold 2 (F916B, F916U, F916W)
- F916B: This is the international variant of the Samsung Galaxy Z Fold 2, often sold in regions outside of North America.
- F916U: The variant designed for the United States market, usually sold by carriers or unlocked.
- F916W: This model is for Canada and is similar to the F916U with minor regional differences.
No matter which variant you own, the screen replacement procedure is similar across all models. However, make sure that the replacement screen you purchase matches the model of your device.
Tools Required for Screen Replacement
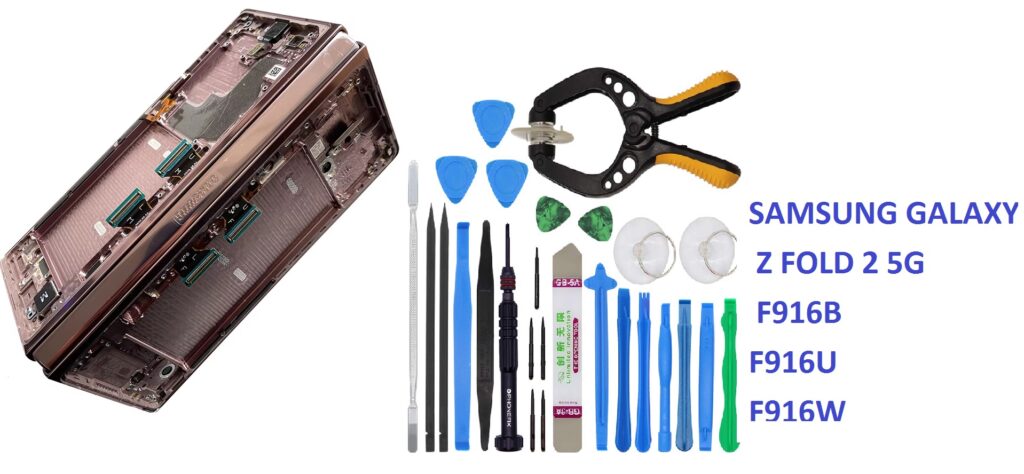
Replacing the screen on the Galaxy Z Fold 2 is not a simple DIY project—it requires precision tools and expertise. Here’s a list of essential tools that you’ll need for this repair:
- Small Phillips Head Screwdriver – Essential for removing screws on the device.
- Plastic Pry Tools – Used to open the phone and separate the screen without damaging the frame.
- Suction Cup Tool – Helps lift the front screen or back cover without applying direct force.
- SIM Card Ejector Tool – Used to remove the SIM card tray.
- Heat Gun or Hair Dryer – To soften the adhesive holding the screen in place.
- Tweezers – For handling small components during the repair process.
- Plastic Spudger – To safely detach connectors without damaging them.
- Anti-Static Wrist Strap – To protect the phone’s internal components from static electricity damage.
- Screen Replacement Kit – Some suppliers offer kits that come with the necessary tools and a replacement screen.
- Microfiber Cloth – To keep the components clean during the process.
- Double-Sided Adhesive Tape – To properly reattach the new screen once it’s installed.
Make sure to work in a clean, organized space to avoid losing tiny screws and parts. Additionally, ensure your device is powered off before starting the repair process.
Step-by-Step Guide to Replacing the External/Internal Screen
Before You Begin
- Backup Your Data: Always backup important data such as photos, contacts, and messages before performing any repair on your device. You may lose all data if something goes wrong during the repair.
- Power Off the Device: It’s essential to power off your Galaxy Z Fold 2 completely to prevent any accidental damage.
- Prepare the Workspace: Make sure you’re working in a clean, dust-free area. You don’t want dust or particles getting inside your device.
- Gather the Tools: Have all the necessary tools ready and laid out in front of you.
Step 1: Removing the Back Cover
- Use the SIM Ejector Tool: Start by ejecting the SIM card tray.
- Apply Heat: Use a heat gun or hair dryer to soften the adhesive that holds the back cover in place. Heat the back of the device for about 1-2 minutes to loosen the glue.
- Pry Open the Back Cover: Use a plastic pry tool to carefully separate the back cover from the device. Start from one corner and work your way around the device, ensuring not to damage the internal components.
Step 2: Disconnecting the Battery
- Remove Screws: Once the back cover is off, you will see screws securing the internal parts. Use the small Phillips head screwdriver to remove these screws.
- Disconnect the Battery: Carefully use a plastic spudger or pry tool to disconnect the battery. This is an important step to prevent any power-related accidents while working on the screen.
Step 3: Removing the External Screen
- Apply Heat: Once the battery is disconnected, use the heat gun to soften the adhesive holding the external screen.
- Lift the Screen: Use the suction cup tool to gently lift the external screen. Once it’s lifted, use the plastic pry tools to carefully detach the screen from the device.
- Remove the Screen: Carefully remove the external screen from the device. Set it aside in a safe place.
Step 4: Replacing the Internal Foldable Screen
- Lift the Internal Screen: The internal foldable display is more complex to remove. You may need to remove more screws and disconnect additional cables carefully.
- Remove the Old Display: Once all screws and connectors are detached, lift the old foldable screen from the device.
- Install the New Display: Place the new internal foldable screen in the proper position, making sure all connectors align properly.
- Reconnect Cables: Reconnect all the cables and components you’ve detached. Ensure the connectors are securely in place.
Step 5: Reassembling the Device
- Reattach the External Screen: Carefully align and reattach the external screen to the device, ensuring it’s properly secured.
- Reconnect the Battery: Once the screens are in place, reconnect the battery.
- Screw Everything Back Together: Use the Phillips head screwdriver to reattach all the screws you removed earlier. Make sure everything is secure, but don’t overtighten.
- Reattach the Back Cover: Carefully press the back cover back into place, ensuring that the adhesive sticks properly.
Step 6: Testing the Device
- Power On: Turn on the Galaxy Z Fold 2 and check if the new screens are functioning correctly.
- Test Touch Sensitivity: Ensure the touch sensitivity is working on both the internal and external screens.
- Inspect for Issues: Check for any display issues such as flickering, dead pixels, or improper color rendering.
If everything works fine, you’ve successfully replaced the screen on your Samsung Galaxy Z Fold 2!
Conclusion
Replacing the internal or external screen on the Samsung Galaxy Z Fold 2 is a complex task that requires precision and attention to detail. While the process can be done by experienced users with the right tools, it is not recommended for beginners, as it can lead to further damage if not done correctly. If you’re not comfortable with the repair process, consider seeking professional help from a certified technician or authorized service center.
By following the detailed instructions and using the proper tools, you can successfully replace the screen on your Samsung Galaxy Z Fold 2, restoring its functionality and appearance. Whether you’re working on the F916B, F916U, or F916W model, this guide has you covered for the screen replacement procedure. Good luck with your repair, and always remember to take safety precautions when handling delicate components!