The Samsung Galaxy Note 20 5G, one of the flagship devices from Samsung, offers an exceptional blend of performance, camera capabilities, and user-friendly features. However, like any smartphone, it is susceptible to wear and tear. One of the most common issues encountered by smartphone users is a faulty USB charging port. If you’re experiencing charging issues with your Samsung Galaxy Note 20 5G (SM-N981U / SM-N981U1), the USB charging port might need to be replaced. This guide will walk you through the process of replacing the USB charging board port on your Galaxy Note 20, providing you with the tools and instructions necessary to complete the task successfully.
Why Replace the USB Charging Port?
The USB charging port (also known as the dock connector) is crucial for charging your device, transferring data, and connecting peripherals. Over time, several factors can cause the port to malfunction:
- Physical damage: Accidental drops or improper cable insertion can damage the USB port.
- Wear and tear: Frequent charging can result in the USB port becoming loose or degraded, making charging difficult.
- Dust and debris: Dirt and dust can accumulate in the port, causing poor connectivity or preventing the charger from making a proper connection.
- Water damage: If the port is exposed to water, it can corrode and stop functioning correctly.
If your Note 20 is experiencing issues like inconsistent charging, failure to charge, or trouble connecting to a computer, it might be time for a USB charging board replacement.
Overview of the Replacement Parts Needed
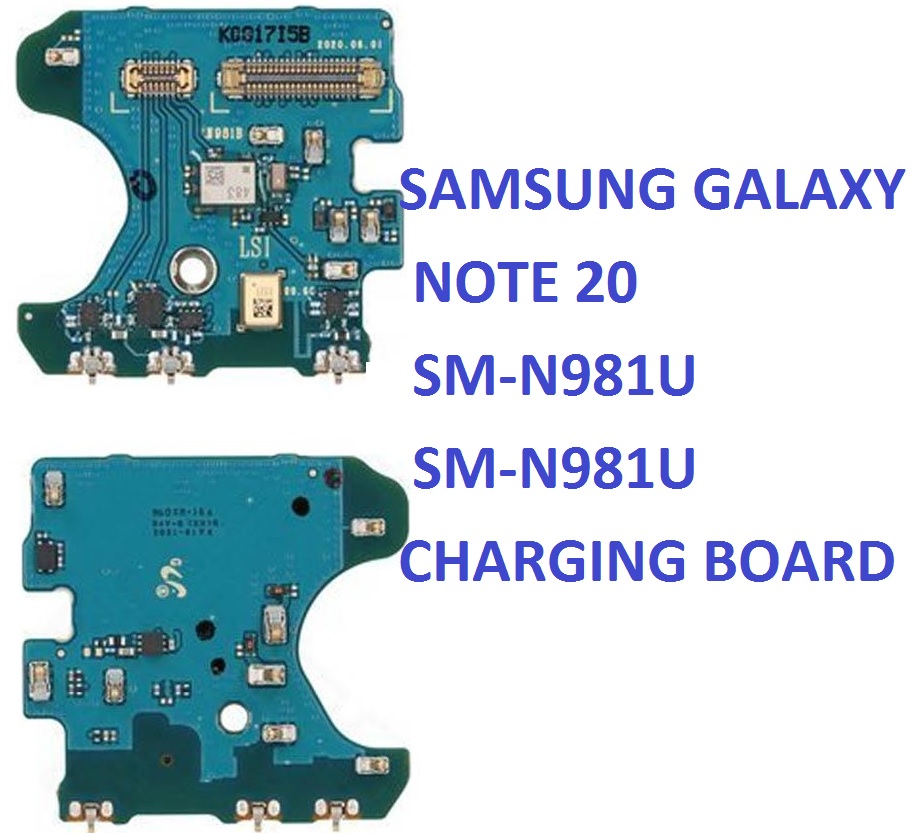
Before you start replacing the charging port, you’ll need to ensure you have the correct replacement parts. The replacement part for your Samsung Galaxy Note 20 5G (SM-N981U / SM-N981U1) is the Type-C Dock Board Connector. This part includes the USB Type-C charging port, as well as the flex cable and other components connected to the board.
You’ll also need some tools to ensure the repair goes smoothly. Here’s a list of the essential tools required:
Tools and Equipment Needed:
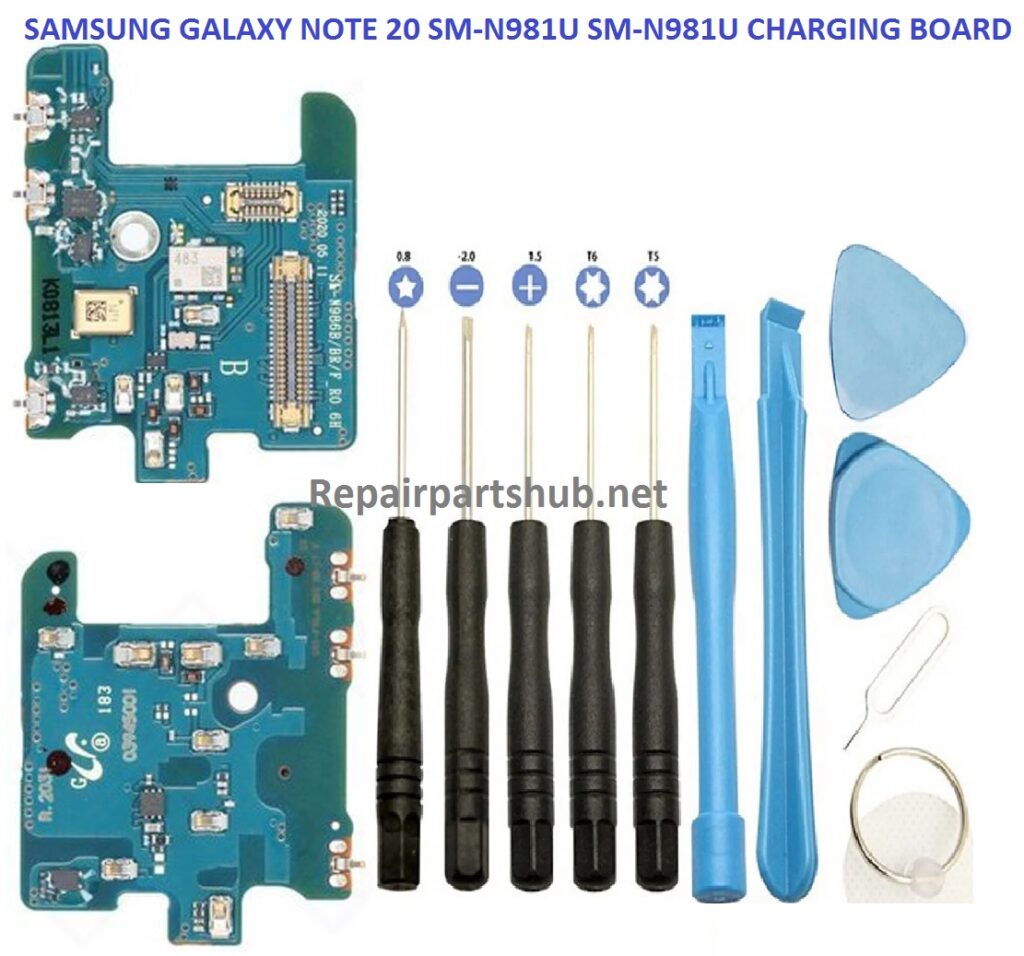
- Replacement USB Charging Board Port (Type-C Dock Connector for SM-N981U)
- Small Phillips head screwdriver
- Plastic Pry Tool
- Tweezers
- SIM card ejector tool
- Suction cup tool
- Heat gun or hairdryer (optional for loosening adhesive)
- Anti-static wrist strap (to prevent static discharge)
- Small Flathead screwdriver
- Tweezers
- Precision tool kit (optional, for disassembling tiny screws)
Having the right tools will ensure that you can replace the charging port safely and efficiently without causing any further damage to your phone.
Step-by-Step Guide to Replacing the USB Charging Board Port on Samsung Galaxy Note 20 5G
Step 1: Power Down Your Device
Before you begin, power off your Samsung Galaxy Note 20 5G to avoid any electrical hazards or accidental damage to the phone. You can power off the device by holding the power button and selecting “Power off” from the menu that appears.
Step 2: Remove the SIM Card Tray
Using the SIM card ejector tool, gently remove the SIM card tray from the side of the phone. This step is crucial because some models may have screws located near the SIM card tray, and removing it will help you avoid damaging the tray during the disassembly process.
Step 3: Heat the Back Cover (Optional)
If your Galaxy Note 20 5G has an adhesive holding the back cover in place, use a heat gun or hairdryer to gently heat the back of the device. This will soften the adhesive and make it easier to remove the back cover without breaking or damaging it.
Hold the heat gun at a safe distance (about 6-8 inches) from the phone’s back and apply heat for about 2-3 minutes. Be careful not to overheat the phone, as excessive heat can cause internal damage.
Step 4: Pry Off the Back Cover
Once the adhesive has been softened, use a plastic pry tool to gently lift the back cover off the device. Start from the edges and work your way around the phone. Take your time and be patient, as applying excessive force may crack the glass.
Step 5: Disconnect the Battery
Once the back cover is removed, the battery will be visible. Using a small Phillips head screwdriver, remove any screws securing the battery connector. Carefully disconnect the battery to prevent any accidental short-circuiting during the repair process.
Step 6: Unscrew and Remove the Old Charging Board
With the battery disconnected, you can now focus on the USB charging board. The charging port is usually located at the bottom of the device. Use the small Phillips head screwdriver to remove the screws holding the charging board in place. Carefully lift the charging board from its slot using a plastic pry tool or your fingers, ensuring you don’t damage the connector cables.
Step 7: Install the New USB Charging Board
Now, take your new USB Type-C dock board connector (replacement part) and carefully align it with the connector slot inside the device. Gently place the board in position and secure it using the screws you previously removed. Make sure the charging port is properly aligned and that the connectors are firmly attached.
Step 8: Reconnect the Battery
Once the new charging board is installed, reconnect the battery by placing the connector back into its designated slot. Ensure that the connection is secure before proceeding.
Step 9: Test the Charging Port
Before reassembling the device, it’s crucial to test the new USB charging port to make sure it works properly. Plug in your charging cable and check for any signs of charging (e.g., charging icon on the screen). If the phone starts charging, you’ve successfully installed the new USB charging board.
Step 10: Reassemble the Phone
If everything is functioning correctly, you can now proceed to reassemble your Galaxy Note 20. First, reconnect the back cover by pressing it into place, ensuring that the adhesive is securely holding it in position. If the adhesive isn’t sticking well enough, you can use a small amount of double-sided tape or a replacement adhesive strip.
Reinstall the SIM card tray and make sure everything is properly aligned. Tighten any screws you had previously removed and confirm that all components are securely attached.
Step 11: Power On the Device
Finally, power on your Galaxy Note 20 5G and test the charging port once again to ensure everything is working perfectly. If the phone charges without issue, congratulations! You have successfully replaced the USB charging board port.
Additional Tips and Considerations
- Take your time: Replacing a USB charging port requires precision and patience. Rushing through the process may cause accidental damage to your phone or the new parts.
- Use quality replacement parts: Always use high-quality, compatible replacement parts to ensure optimal performance and longevity of your device.
- Backup your data: Before performing any repairs, it’s a good idea to back up your data in case something goes wrong during the process.
Conclusion
Replacing the USB charging port on your Samsung Galaxy Note 20 5G (SM-N981U / SM-N981U1) may seem like a daunting task, but with the right tools, parts, and instructions, it can be done successfully. Follow the steps outlined above to restore your phone’s charging functionality and extend its lifespan.
If you’re not comfortable performing the replacement yourself or if the phone has additional issues, it may be best to consult a professional technician or visit an authorized repair center. However, if you’re confident in your repair skills, this guide should provide you with everything you need to complete the job on your own.
With a little effort, you’ll have your Samsung Galaxy Note 20 5G charging like new again!