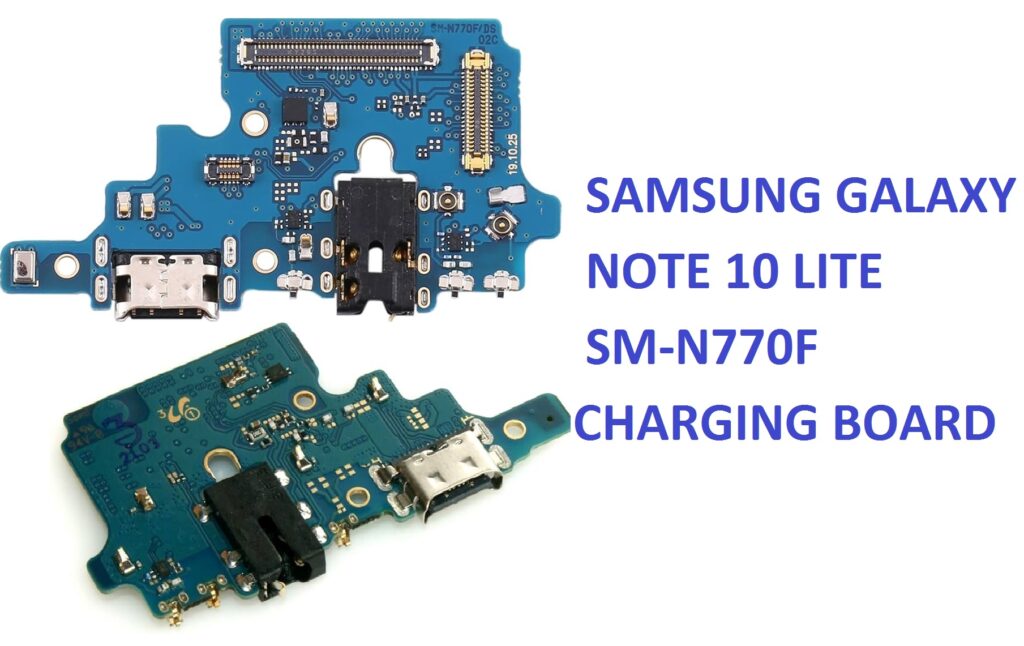
The Samsung Galaxy Note 10 Lite (SM-N770F) is a fantastic device that combines powerful performance with a sleek design. However, like any electronic device, it is susceptible to wear and tear over time. One common issue users may face is a malfunctioning charging port. If your Note 10 Lite is not charging properly, the charging port board might be damaged or faulty.
In this comprehensive guide, we will walk you through the entire process of replacing the charging port board in your Samsung Galaxy Note 10 Lite (SM-N770F). We will also highlight the tools you will need for the job and provide helpful tips to ensure that you can carry out the repair with ease.
Why Should You Replace the Charging Port Board?
Before we dive into the replacement procedure, it’s important to understand why your charging port board might need replacement. Here are some of the common signs that indicate the charging port is faulty:
- Intermittent Charging: The device may charge intermittently, requiring you to find the “sweet spot” on the charging cable to get it to work.
- No Charging: The phone refuses to charge altogether when connected to a charger.
- Overheating: A damaged port may cause the device to overheat during charging.
- Loose or Worn-Out Port: If the charging port feels loose or doesn’t grip the charging cable properly, it’s likely the internal components are damaged.
- Physical Damage: Any visible wear, such as bent or broken pins inside the port, is another sign that a replacement is needed.
If you’re experiencing any of these symptoms, replacing the charging port board might be the solution. This replacement process requires some technical skills and patience, but it can be accomplished with the right tools and steps.
Tools Required for Charging Port Board Replacement
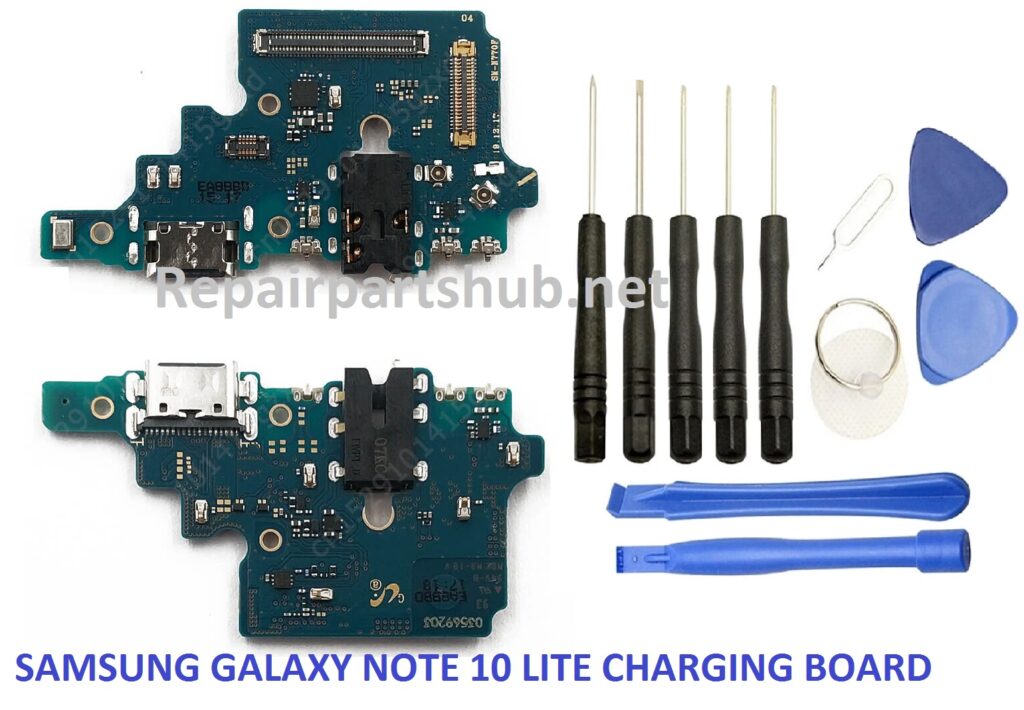
Before you begin the replacement process, ensure you have the necessary tools to safely and effectively complete the repair. Here’s a list of tools that will help you replace the charging port board on your Samsung Galaxy Note 10 Lite:
- Small Philips Head Screwdriver: This is essential for removing screws from the device.
- Plastic Pry Tools: These tools allow you to safely open the phone without damaging or scratching the frame.
- Tweezers: Useful for handling small components and screws.
- SIM Card Ejector: To remove the SIM card tray before disassembling the device.
- Heat Gun (Optional): Some adhesive may require softening before you can safely remove parts, so a heat gun is useful.
- Suction Cup Tool: Helps with lifting the rear panel without putting unnecessary strain on the device.
- Anti-static Wrist Strap: Prevents any static charge from damaging the phone’s delicate components during the repair.
- Replacement Charging Port Board for Galaxy Note 10 Lite: Make sure you purchase a high-quality replacement part that is compatible with the SM-N770F.
- Plastic Spudger: To pry apart the phone without damaging sensitive parts.
- Small Container for Screws: Keeps screws organized during disassembly.
Step-by-Step Guide: Replacing the Charging Port Board
Now that you have all the necessary tools, let’s dive into the replacement process. Follow these steps carefully to replace the charging port board in your Samsung Galaxy Note 10 Lite.
Step 1: Power Down the Device
Before you start working on the phone, make sure to power it down completely. This is important to avoid any electrical issues or accidental damage to the internal components.
Step 2: Remove the SIM Card Tray
Using the SIM card ejector tool, gently remove the SIM card tray from the side of the phone. This step is crucial because some screws and components may be hidden under the tray.
Step 3: Unscrew the Back Panel
Using the small Philips head screwdriver, begin removing the screws around the perimeter of the rear panel. Typically, there will be several screws that need to be removed. Keep track of these screws in a small container to avoid losing them.
After all the screws are removed, use a plastic pry tool to gently separate the rear panel from the rest of the phone. Be patient, as the adhesive may require a little force to break. If necessary, use a heat gun or a hairdryer to soften the adhesive slightly before trying to separate the panel.
Step 4: Disconnect the Battery
Once the back panel is removed, you will have access to the internal components of the phone. The next step is to disconnect the battery to prevent any accidental short circuits while working on the device. Use a plastic spudger or your fingers to gently disconnect the battery connector from the motherboard.
Step 5: Remove the Old Charging Port Board
Locate the charging port board, which is typically located near the bottom of the device. You may need to remove additional screws or components to free the charging port from the phone’s frame. Once the screws are removed, gently lift the charging port board from its place using the plastic spudger or tweezers.
Take care not to damage any surrounding components or connectors. The charging port may be secured with adhesive, so use a heat gun if needed to soften the adhesive and make it easier to remove.
Step 6: Install the New Charging Port Board
Once the old charging port board is removed, take the new replacement charging port board and carefully place it into the slot. Make sure it aligns properly with the internal connectors and ports.
Reattach any screws or clips that are holding the board in place. Ensure that the charging port is securely fastened and properly aligned with the rest of the device.
Step 7: Reconnect the Battery
After the charging port board is securely in place, reconnect the battery by gently pressing the battery connector back into its socket on the motherboard.
Step 8: Reassemble the Device
Once everything is securely reconnected, it’s time to reassemble your Galaxy Note 10 Lite. Carefully position the back panel back onto the device and press it into place. Reinsert the screws you removed earlier and tighten them with your screwdriver.
Don’t forget to insert the SIM card tray back into its slot.
Step 9: Test the New Charging Port
Before powering up the phone, it’s a good idea to test the new charging port board. Connect your charger and see if the device is charging properly. Check for any loose connections or issues with the port itself.
Once you’ve confirmed that the charging port is working as expected, power the device back on.
Conclusion
Replacing the charging port board on your Samsung Galaxy Note 10 Lite (SM-N770F) may seem like a daunting task, but with the right tools and careful attention to detail, you can complete the repair yourself. Not only will this save you money on repairs, but it will also give your device a longer lifespan.
Remember to always work in a clean, static-free environment, and take your time with each step to ensure a successful replacement. If you’re unsure about any part of the process, consider consulting a professional technician or watching online tutorials for additional guidance.
By following these steps, you’ll have your Galaxy Note 10 Lite up and running with a fully functional charging port in no time!
Disclaimer: Always remember that working on your phone yourself may void the warranty if applicable. If you’re unsure about your ability to complete the repair, it’s always best to consult with a professional technician.