
If you’re experiencing charging issues, data transfer problems, or even difficulty connecting your Samsung Galaxy Note 10 (N970 / N970U / SM-N970U) to other devices, the USB charging port flex board could be the culprit. This component plays a critical role in managing the charging functionality and communication between your phone and external devices, so a malfunctioning port can cause serious inconvenience.
In this blog post, we’ll guide you through the process of replacing the USB charging port flex board on your Galaxy Note 10. Additionally, we’ll discuss the tools required for the replacement and provide tips for a smooth repair experience.
Signs You Need a New USB Charging Port Flex Board
Before diving into the replacement process, let’s take a moment to identify whether the USB charging port flex board is indeed the issue:
- Charging Problems: If your device struggles to charge or doesn’t charge at all despite using a functional charger and cable, the USB charging port might be damaged.
- Data Transfer Issues: If your Galaxy Note 10 can’t establish a connection with your computer or other devices when plugged in, the charging port might be defective.
- Loose or Wobbly Port: A physically damaged or worn-out charging port can cause loose connections, leading to unreliable charging.
- Physical Damage: If the port is visibly damaged from dust, debris, or physical impact, it’s likely time for a replacement.
Tools You’ll Need
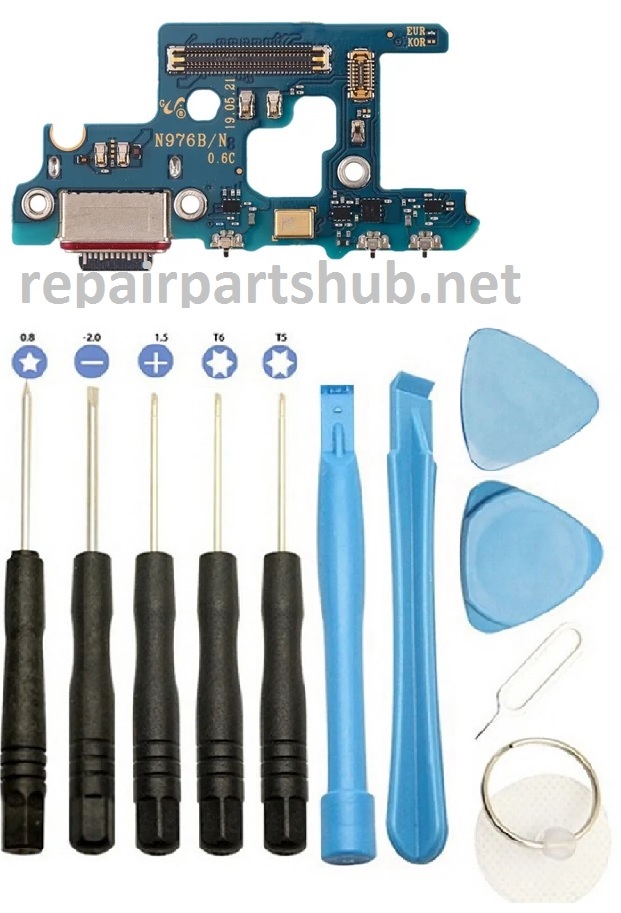
Before getting started, make sure you have the right tools for the job. While replacing the USB charging port flex board isn’t an overly complex procedure, it does require precision and the right equipment. Here’s a list of the essential tools:
- Screwdrivers: A set of precision screwdrivers, particularly a PH000 (small Phillips-head screwdriver), is essential for removing screws from your device.
- Plastic Pry Tools: These help you open your device without damaging the screen or body.
- Suction Cup: To safely detach the screen from the body of the phone.
- Tweezers: For handling small parts and ensuring a delicate process when disconnecting components.
- SIM Card Ejector: To remove the SIM card tray and free up space for opening the device.
- Heat Gun or Hair Dryer: Sometimes, the adhesive used in the phone’s construction can be tough to break through, so mild heat may be required to loosen it.
- Replacement USB Charging Port Flex Board: Make sure you purchase a quality replacement part compatible with the Galaxy Note 10 (N970 / N970U / SM-N970U).
Steps to Replace the USB Charging Port Flex Board
Now that you have all the necessary tools, let’s walk through the process of replacing the charging port flex board.
Step 1: Power Off Your Device
First things first—ensure your phone is powered off to avoid any accidental electrical damage during the repair.
Step 2: Remove the SIM Card Tray
Using the SIM card ejector tool, remove the SIM card tray to create a bit of extra space for the opening procedure.
Step 3: Heat the Phone (Optional)
If your device has adhesive that is difficult to remove, gently heat the edges of the device using a heat gun or hair dryer for 30–60 seconds. This will soften the adhesive and make it easier to open the phone.
Step 4: Pry Open the Back Cover
Use a suction cup tool to lift the back cover and plastic pry tools to carefully work your way around the device. Be careful not to apply too much force as this can crack the glass.
Step 5: Remove the Screws and Disconnect Components
After opening the device, you’ll find screws securing various components. Using your precision screwdriver, remove these screws and set them aside in a safe spot.
Now, disconnect the battery to ensure there’s no power running through the device. You can also disconnect other components that are blocking access to the charging port.
Step 6: Disconnect the Old USB Charging Port Flex Board
The charging port flex board will likely be secured with screws or adhesive. Carefully disconnect any cables attached to the charging port and unscrew any mounting screws that are holding the flex board in place.
Step 7: Install the New USB Charging Port Flex Board
Once the old charging port flex board is removed, place the new one into position. Make sure that all connections align properly and that the port is securely in place. Reconnect any cables that were previously disconnected and screw the new board into place.
Step 8: Reassemble the Device
Now that the new charging port flex board is installed, it’s time to reassemble your phone. Reconnect the battery, secure the back cover, and screw everything back into place.
Step 9: Power On and Test the Charging Port
Once your device is fully reassembled, power it on and test the new charging port. Plug in your charger and check if your phone charges correctly. Also, try data transfer to ensure the new flex board is functioning properly.
Step 10: Final Check
Lastly, check the overall functionality of your phone, making sure all other components are still working as they should (such as the screen, buttons, and other ports). If everything works correctly, you’ve successfully replaced your charging port flex board!
Where to Buy a Replacement USB Charging Port Flex Board
When purchasing a replacement USB charging port flex board for your Galaxy Note 10, make sure to buy from reputable sources. Look for trusted sellers with good reviews and ensure that the part is compatible with your exact model (N970 / N970U / SM-N970U). You can find these parts on sites like Amazon, eBay, or specialized phone repair parts retailers.
Conclusion
Replacing the USB charging port flex board on your Samsung Galaxy Note 10 might seem like an intimidating task, but with the right tools and a little patience, you can successfully complete the repair on your own. Whether you’re dealing with charging problems, data transfer issues, or physical damage to the port, following these steps will help you restore your phone to full working condition.
If you’re not comfortable performing the repair yourself, consider reaching out to a professional technician for assistance. That way, you can ensure the job is done correctly without risking further damage to your device.
Happy repairing!